15 Measuring Instrumental Magnitudes with GAIA
This recipe shows how to use GAIA (see SC/17[17] and SUN/214[20]) to measure instrumental
magnitudes for objects in a CCD frame. The objects may be either standard stars or programme
objects. The techniques for measuring instrumental magnitudes are discussed in Section 10.
The starting point is a CCD frame which has been processed to remove instrumental effects. This
process typically includes: removing cosmic-ray events and other blemishes, de-biasing and
flat-fielding. It is described in SC/5: The 2-D CCD Data Reduction Cookbook[18] and in SUN/139[19], the
manual for the CCDPACK package, and is not considered further here. SC/5 is a good
introduction.
GAIA is a powerful and flexible windows-based application for displaying and measuring two-dimensional
images. In principle the current recipe is very similar to the previous one which used PHOTOM (see
Section 14).
However, unlike the PHOTOM recipe, in GAIA the image display and photometry are integrated into
a single easy-to-use application.
The example CCD frame used in this recipe is available as file:
/star/examples/sc6/ccdframe.sdf
If you intend to work through the recipe using this file you should make a copy of it in your current
directory. Alternatively, you may prefer to use a CCD frame of your own.
-
(1)
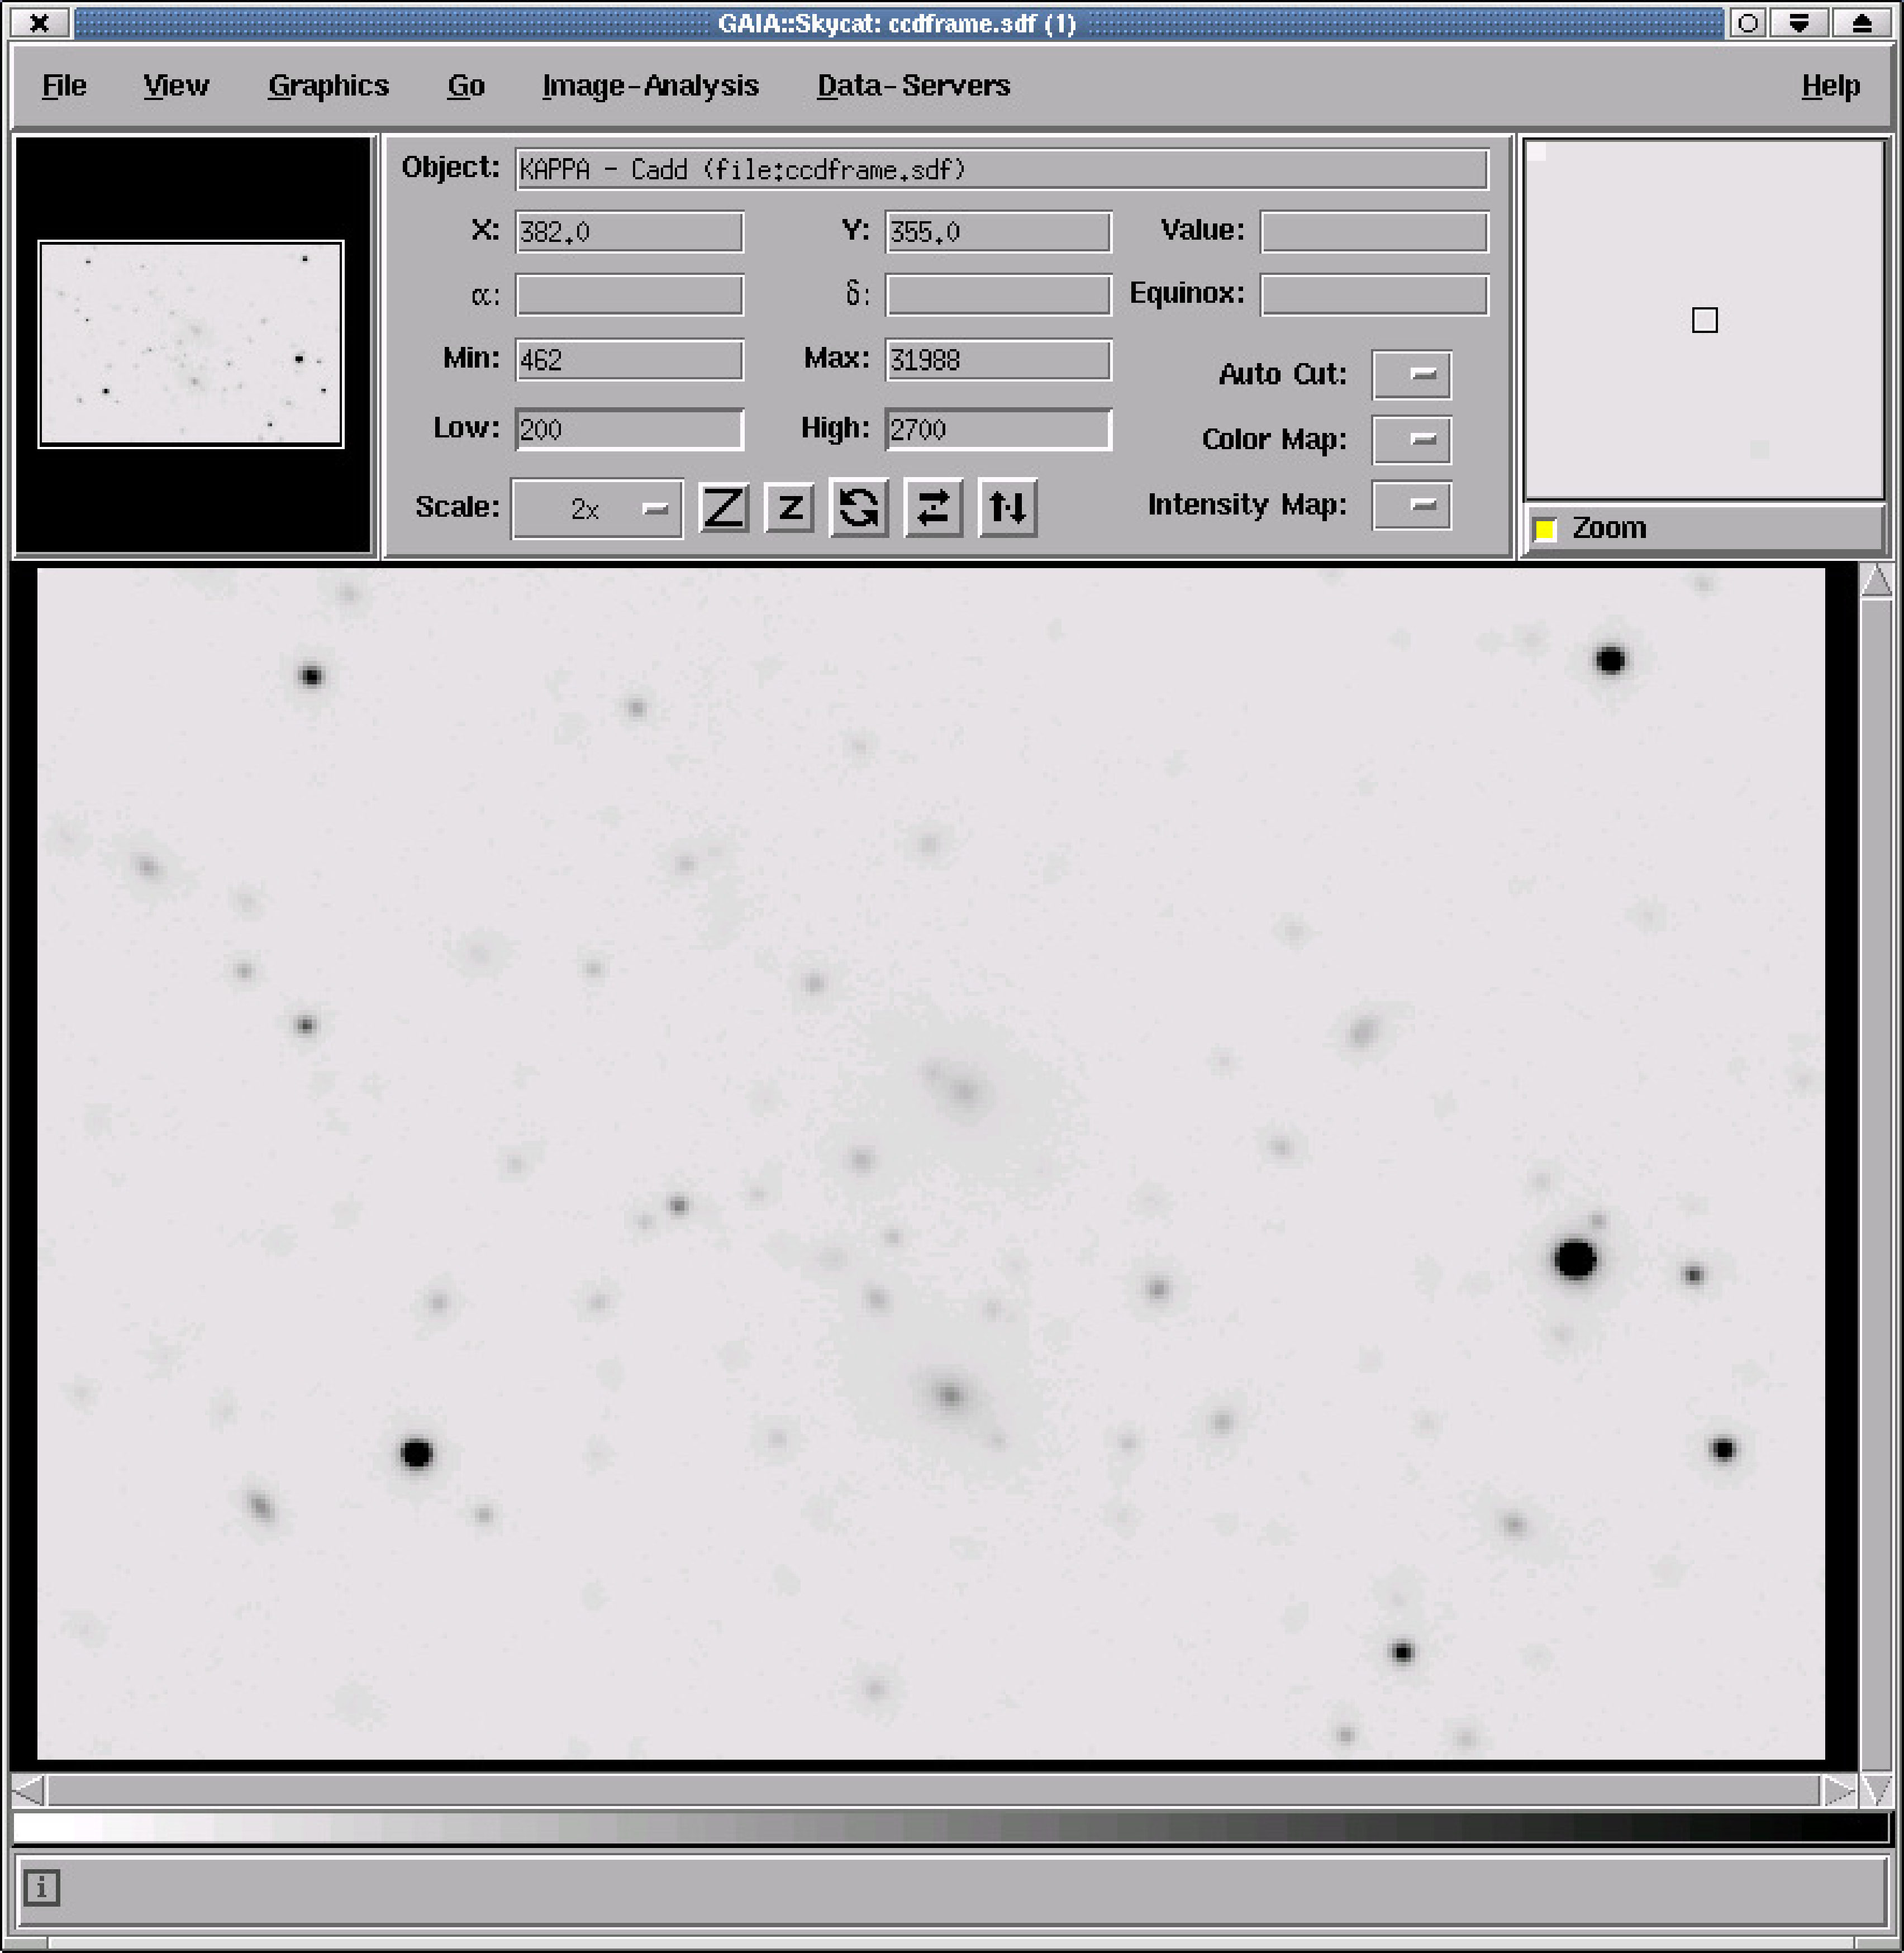
- To start GAIA type:
Load the appropriate image by clicking the File menu, selecting Open… and using the file-picker
panel displayed.
-
(2)
- Now set the display colours. For example, click on the View menu and select the Colors… option.
A dialogue box will appear. Set:
- the colour scale algorithm to Linear,
- the colormap to ramp,
- the intensity to neg.
Then click on the Close button.
Set the limits of the colour table by specifying the Low and High values in the Object panel at the
top centre of the main window. If you are using the example frame suitable values are 200 and
2700 respectively.
Finally, you might want to set the magnification. Click on the View menu and select Magnification.
For the example frame the value 2x is suitable. The display should now look something like
Figure 10.
-
(3)
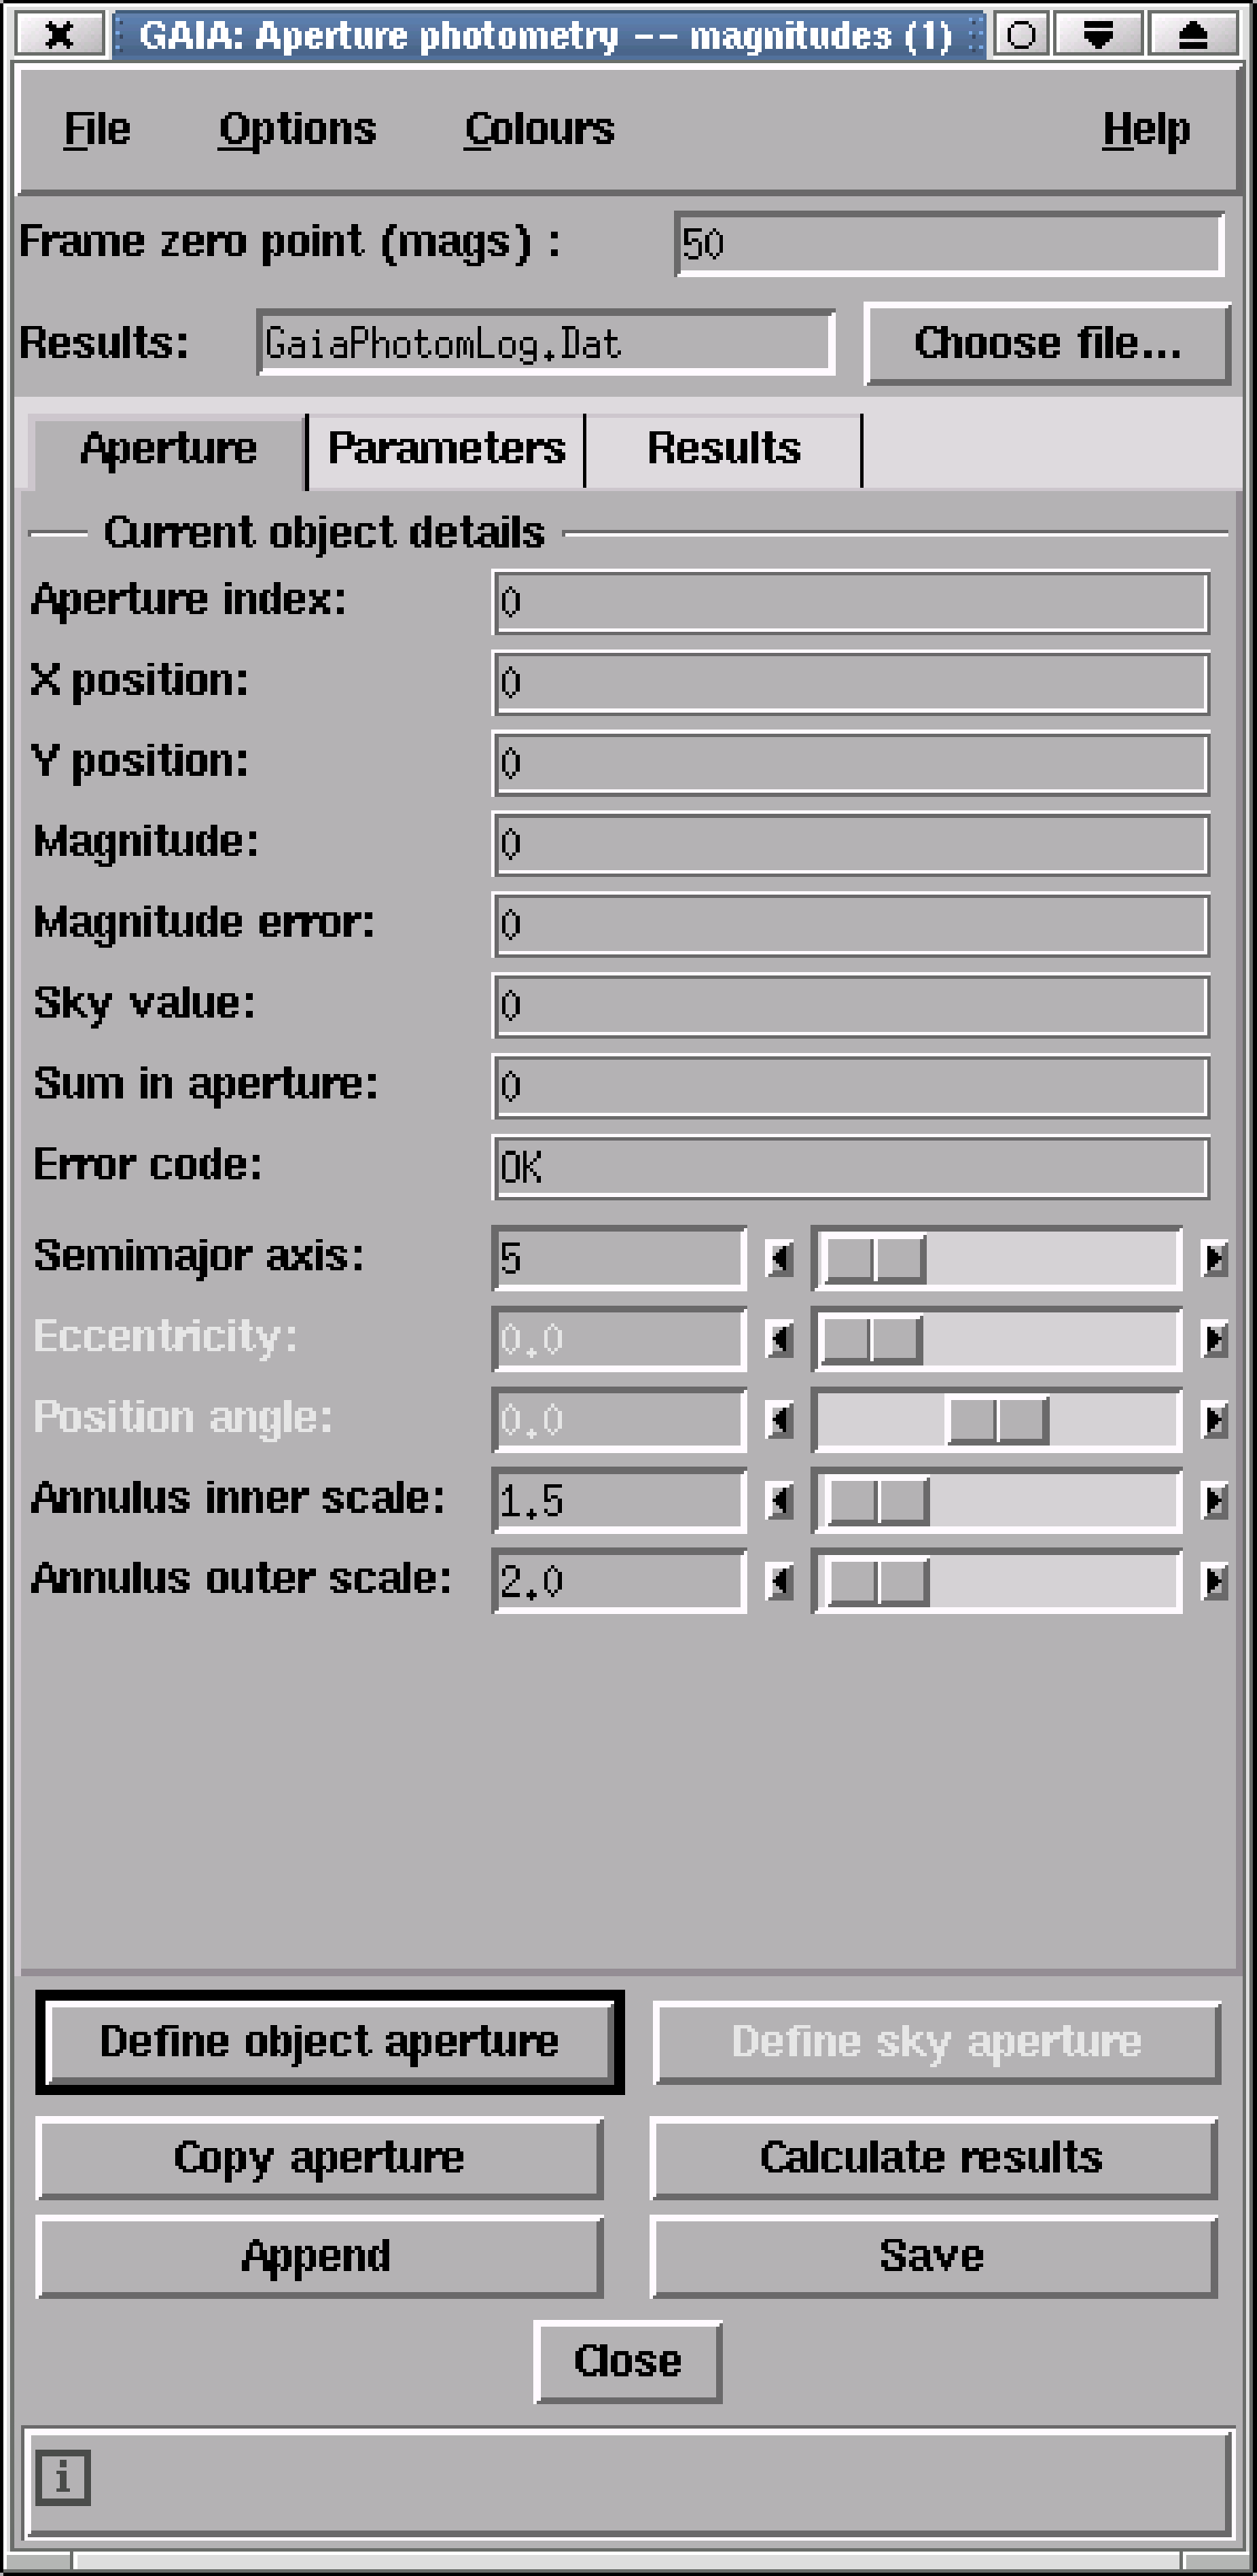
- You can now proceed to measure instrumental magnitudes. Click on the Image Analysis menu on
the menu-bar along the top of the main window. Choose the Aperture photometry item. Two
further items will be presented: Results in magnitudes… and Results in data counts…. Choose the
former, Results in magnitudes…. (Both these options allow you to perform aperture photometry.
The former displays the results in magnitudes, the second in counts.) An Aperture photometry –
magnitudes dialogue box (see Figure 11) will be displayed. You can drag this dialogue box off the
display panel if necessary.
As in the previous recipe for PHOTOM, you should set the Frame zero point (mags) to an
improbable value, typically 30, so that the instrumental magnitudes are not inadvertently
confused with calibrated ones.
This is a good time to mention on-line help. Clicking the Help menu in the
bar at the top of the photometry dialogue box, followed by On Window… will
bring up a window with a pretty comprehensive description of how to use
the aperture-photometry facilities.
The process is now straightforward. Following the instructions in the on-line help, proceed as
follows.
-
(a)
- Click the Define object aperture button.
-
(b)
- Place your cursor on the image over the star that you wish to measure.
-
(c)
- Press down and hold down mouse button 1.
-
(d)
- Move the mouse sideways until the circle contains all the star.
-
(e)
- Release the mouse button.
-
(f)
- Click the Calculate results button.
-
(g)
- Inspect the Current object details (displayed in the upper-middle portion of the
dialogue box) and view the instrumental magnitude of the star.
You can change things like the inner and outer radii of the annulus for measuring the sky
background by moving the sliders in the Aperture Photometry – magnitudes dialogue box.
Apertures are drawn around stars as they are measured.
-
(4)
- Clicking on the Options menu in the bar at the top of the Aperture photometry – magnitudes
dialogue box will allow you to alter settings by using ‘push buttons’ that are labelled:
- Use annular sky regions
- Use circular apertures
- Keep apertures same size
By de-selecting the first button here (Use annular sky regions), you can use interactive apertures to
measure the sky background, and by de-selecting the second you can use ellipses instead of
circles. Because GAIA is acting as a ‘front-end’ to PHOTOM most of the parameters which can
be set in PHOTOM can also be set in GAIA.
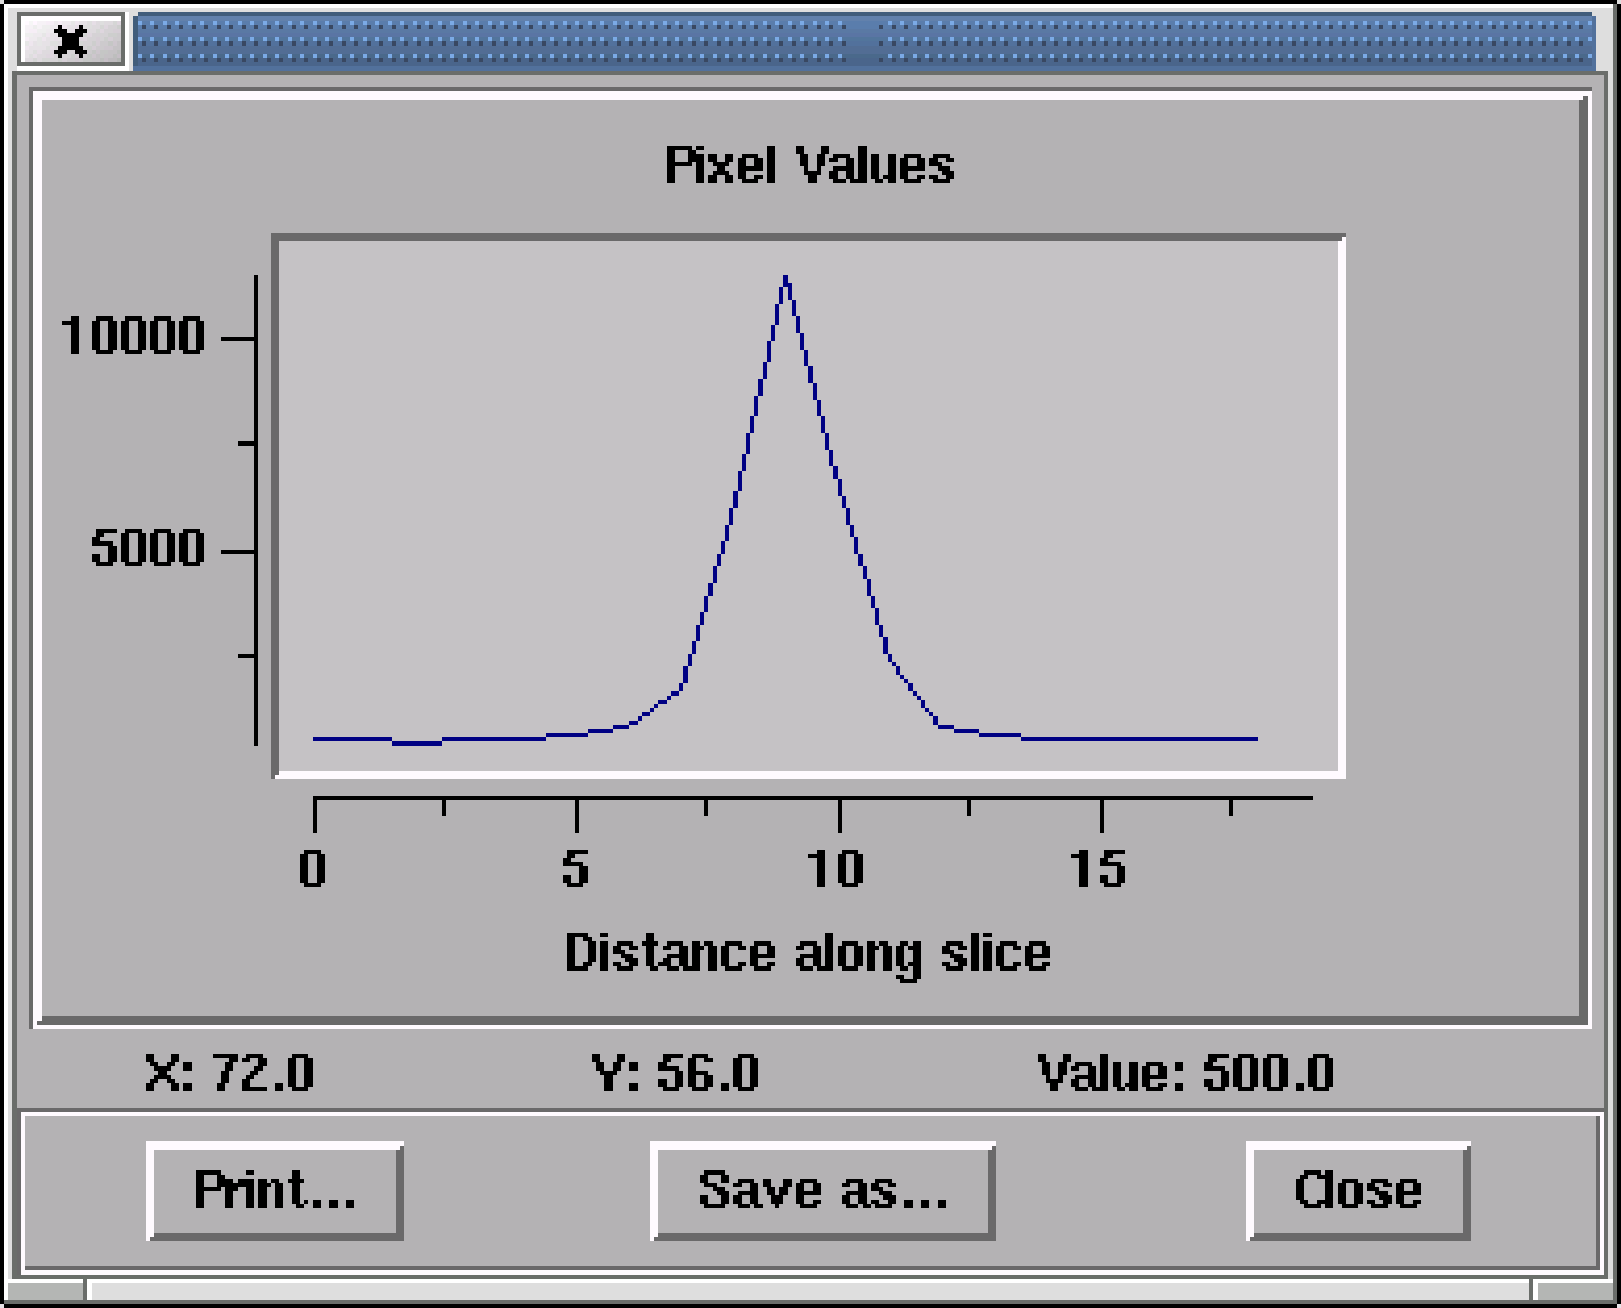
There is a nice feature in GAIA that is of use when deciding how big to
make the aperture radius. By Clicking on the View menu in the main window
and selecting the Slice… option it is possible to obtain a ‘cut’ or ‘slice’ across
any star image on-the-fly (see Figure 12). This option can usefully be used to
estimate how far out from the star useful signal exists.
-
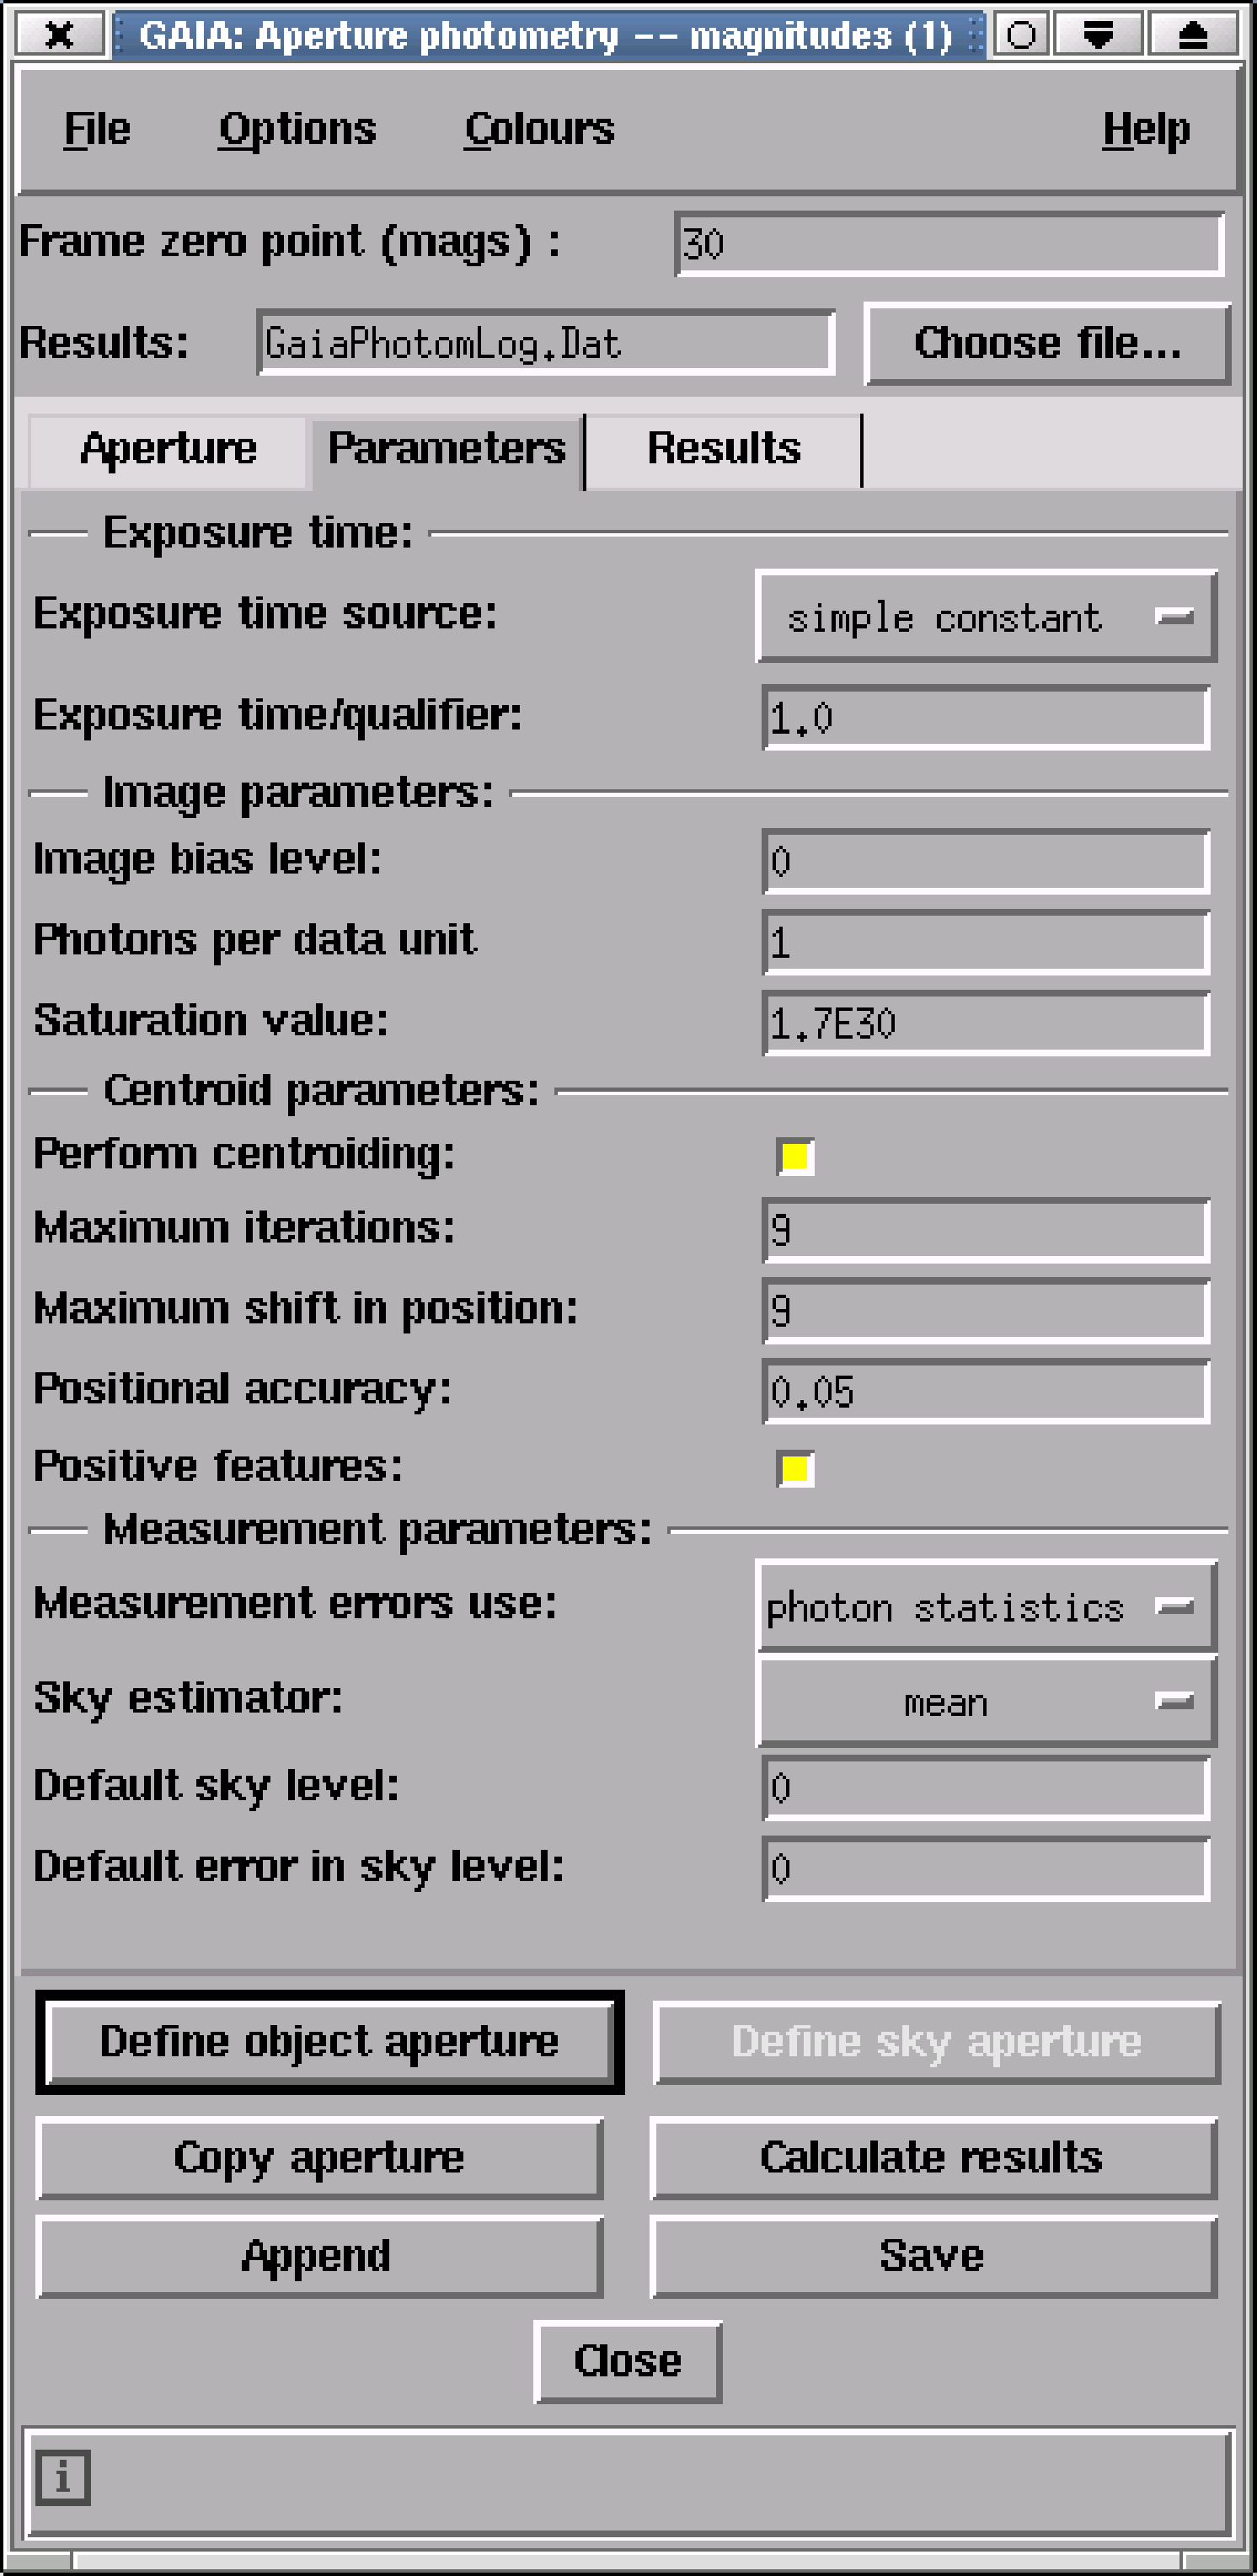
(5)
- If you click on the Parameters button in the Aperture photometry – magnitudes dialogue box the
appearance of the box changes to resemble Figure 13. You can now set various parameters, such
as the Photon data per unit, image bias level, default sky level etc.
By default the statistic used to estimate the sky background is the mean.
Usually it is preferable to use the mode because it is less affected by
contamination due to faint stars. To select the mode click on the Sky
estimator: button and select the mode (see Figure 13).
-
(6)
- You should measure all the stars that you are interested in the current frame. (Click on the
Aperture button prior to resuming measuring, if necessary.) When the job is done, click on the File
menu in the menu-bar along the top of the Aperture photometry – magnitudes dialogue
box (not the one in the main GAIA window) and select Save measurements… to save
the results in a file of your choice. The instrumental magnitudes are listed in this
file.
Copyright © 2001 Council for the Central Laboratory of the Research Councils