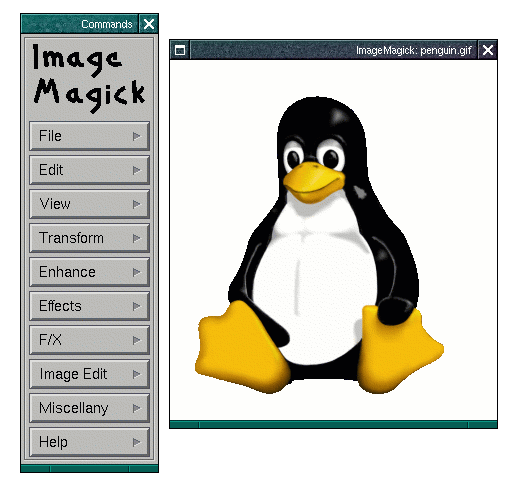
Figure 13: The ImageMagick
display GUI.There is so much graphics and image manipulation software available, usually under the GNU Public License (GPL), that I couldn’t possibly hope to cover it all. Although I have tried to cover the major packages, new (sometimes better) applications appear every day.
ImageMagick, is a collection of GUI and command line tools along with callable libraries allows you to read, write, and manipulate images in any of the more popular image formats including GIF, JPEG, TIFF, PNG and PDF.
There are two methods for accessing the capabilities of ImageMagick. Firstly you can incorporate its functionality directly into your own code by linking to the ImageMagick libraries, you can do this from several languages, including Perl, C, C++, Java and Python. More information can be found in the ImageMagick Users Guide at http://www.wizards.dupont.com/cristy/ImageMagick.pdf.
You can also access ImageMagick functions directly from the command line using the display,
import, animate, montage, convert, mogrify, identify, and combine tools. These tools allow powerful
manipulations to be carried out on images in a manner understandable to anyone familiar with the
UNIX way of doing things, for instance:
pipes the output of convert into the display application to get a intensity histogram for the image
file.jpg. Here the use of “-” for the file specifier (for both convert and display) directs the
applications to use standard input and output (i.e. streams).
displayNot to be confused with KAPPA display, the ImageMagick display program is an image processing
tool. The program is invoked from the command line as below, Figure 13 shows the interface to the
application.
The display application is a powerful image manipulation and processing tool, full details of its
functions can be found at http://www.wizards.dupont.com/cristy/www/display.html.
One important point for people used to xv is that the command menu is brought up by left clicking on
the image rather than right clicking (as with xv).
importimport reads an image from any visible window on your X Windows desktop and outputs it as an image
file. You can capture a single window, the entire screen, or any rectangular portion of the screen. Full
details of its functions can be found at http://www.wizards.dupont.com/cristy/www/import.html.
For instance, to capture the entire X Windows desktop screen in the JPEG image format in a file titled
root.jpg, use:
While to select a a specific window, using the mouse, and save it in Encapsulated Postscript format use:
A common problem with import running on pseudo colour displays is that the image it
captures sometimes has the wrong colour map. To correct this use the -descend option,
e.g.
By default, import quickly grabs the image from the X server. However, it may not always have the
correct colors in some areas. This can happen when a sub-window has a different colour map than its
parent. With -descend, import descends the window hierarchy. Descending involves grabbing the
image and colour map of each window or sub-window associated with the window you select and
combining them on a blank canvas. This can be significantly slower than just grabbing the
top-level window but ensures that the final composite image will have the correct colour
map.
animateanimate displays a sequence of images. To help prevent color flashing on pseudo colour displays,
animate creates a single colourmap from the image sequence. This can be rather time consuming. You
can speed this operation up by reducing the colours in the image before you “animate” them. Use
mogrify to colour reduce the images to a single colourmap. Full details can be found at
http://www.wizards.dupont.com/cristy/www/animate.html.
montagemontage creates a composite by combining several separate images. The images are tiled on the
composite image with the name of the image optionally appearing just below the individual
tile.
convertNot to be confused with the Starlink CONVERT package, the ImageMagick convert program converts
an input file from one image format to an output file with a differing image format. Various
types of image processing can be performed on the converted image during the conversion
process.
For example, to convert a TIFF image to an A4 Postscript page with the image in the lower left corner we would use:
Or to annotate an image with the word “Stuff” written in blue at position (100,100) in the Helvetica 12x24 pixel font, we would use:
In this case we read in a JPEG file and write out a MIFF (ImageMagick internal format) file. Full details
of the different file formats handled by convert can be found on the ImageMagick web site at
http://www.wizards.dupont.com/cristy/www/convert.html.
mogrifymogrify performs transformations such as scaling, rotation and colour reduction on a image or series
of images.
For instance to scale an image to 640×40 pixels we would use:
identifyidentify describes the format and characteristics of one or more image files. It will also report if an
image is incomplete or corrupt. The information displayed includes the scene number, the file name,
the width and height of the image, whether the image is colourmapped or not, the number of colors in
the image, the number of bytes in the image, the format of the image (JPEG, PNM, etc.), and finally the
number of seconds it took to read and process the image. An example line output from identify
follows:
If -verbose is set, expect additional output including any image comment, e.g.
combineThe combine program is used to, well combine, two or more images into a single new images. For
instance, to compute the difference between two images in a series you could:
Or to combine a red, green and blue colour plane into a single composite image:
XTPNot strictly an image-processing application, xtp is a non-interactive replacement for ftp.
XMagick is a C library, which allows integration of the ImageMagick library calls with any X application by providing functions which convert between the native X image format (XImage) and the native ImageMagick format (Image).
The example code below, which is included in the library, reads an image image.xpm, converts the
Image to an XImage and back, and stores the result as image2.xpm.
The prototypes for the XMagick conversion calls are as follows:
XImage *XMagickImageToXImage(Display *display, Image *image)NULL if not successful.
Image *XMagickXImageToImage(Display *display, XImage *ximage)NULL if not successful.The Xmagick library is available via anonymous FTP from ftp://siag.nu/pub/xmagick/.
PythonMagick, is a interface to ImageMagick. It is similar in function to the Python Imaging Library and calls to PythonMagick can be combined with calls to the Imaging Library. A simply example script from the PythonMagick distribution is shown below:
PythonMagick, is a interface to ImageMagick. It is similar in function to the Python Imaging Library and calls to PythonMagick can be combined with calls to the Imaging Library. A simple example script from the PythonMagick distribution is shown below:
The XV program seems to have been around forever, it was first released sometime during 1990, with the current release version being 3.10a. For a long time it was not only the best image manipulation package available for UNIX, it was the only image manipulation package available for UNIX.
Despite many people using it to convert images from one format to another, XV doesn’t have any
support for bulk conversions, if you want to convert a lot of images from one format to another you
should probably look at PBMplus. XV is definitely not a paint program, if you are interested in
creating graphics you should look towards the GIMP, xpaint or xfig. While XV does have some
features of a paint program they aren’t that high powered, for instance I very heavily recommend
against using the text annotation command in XV.
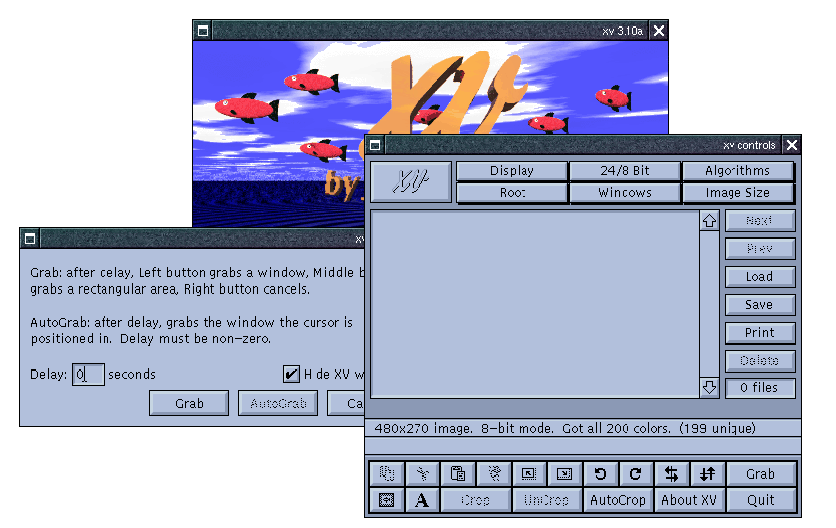
XV is primarily a graphics display and manipulation package, you can see an example of the interface in use in Figure 14.
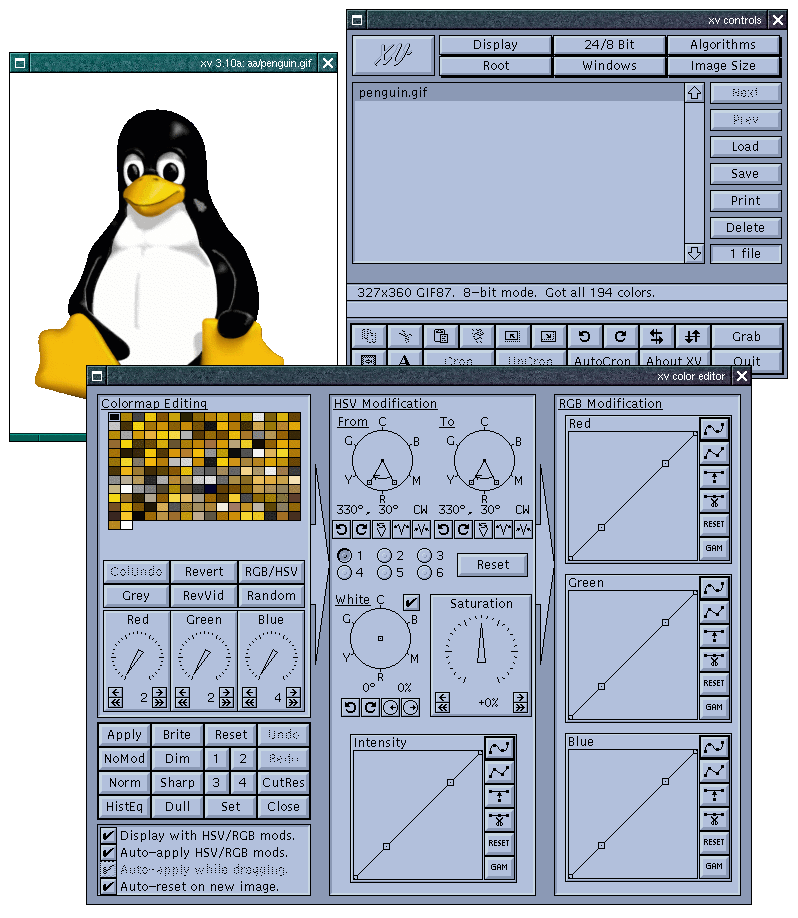
xv interface along with the Color Editor Dialog (accessed from the Windows
pull down menu).While the interface is usually fairly self explanatory, the package has a very good online manual available at http://www.trilon.com/xv/manual/xv-3.10a/cover.html.
Most of the screen captures you’ll see in this cookbook were done using XV. Simply run xv, right click
on the XV window to bring up the control panel, and hit the Grab button bring up the Grab Dialog
(see Figure 15). Check the “Hide XV Windows” tick-box, so that the XV windows will disappear
while you are doing the screen grab, and hit the Grab button. A single click on your desktop will now
carry out a screen grab.
XV has a problem displaying images which are less than 100 pixels wide, it will actually stretch the
images to this minimum size if you try and get it to display something smaller. This problem is due to
your window manager rather than XV itself. XV tries to automatically resize the image window to the
size of your image, however most modern window managers enforce a minimum window size (so
there is room for the minimise/maximise buttons and other such things in the title bar). There are two
workarounds. Firstly, you can start XV with the -nodecor command line argument, this should allow
XV to resize the window to the correct dimensions. However, depending on your window
manager this may cause you problems trying to move the XV window around the screen.
Alternatively, you can accept that the image is going to be displayed incorrectly, so long as
you check the Normal Size box in the XV save dialog the image will be written to disk
correctly.
The current version of XV is 3.10a, there probably won’t be a version 3.2 (or the long awaited version 4.0) until the author is successful in sorting out a licence to use the LZW compression algorithm with UniSys.
Both source code and binary distributions are available for download, along with a selection of patches and enhancements, from http://www.trilon.com/xv/downloads.html. The patches provided at the site are not pre-applied to the standard distributions. Enhancements include patches to read/write PNG and PDF files, so it is worth applying them if you are going to the trouble to compile the source.
There are two, minor, source-code changes that need to be made to get XV to compile under RH6.0.
Firstly in xv.h lines 119-121 should be commented out, otherwise the compilation will fail with an
“already defined in stdio.h” error.
Additionally, in the machine-specific options of the package Makefile the Linux entry need to specify
the full path to the X11 libraries. So line 105 needs to read:
It may surprise some people but XV has not been released under the GPL or another similar community licence. For personal use XV is shareware, if you find it useful you should register the program with the author ($25). Commercial, government, and institutional users must register their copies of XV. Users at Starlink sites are covered by the project wide XV licence purchased by Starlink. More information about XV licensing issues can be found http://www.trilon.com/xv/pricing.html.
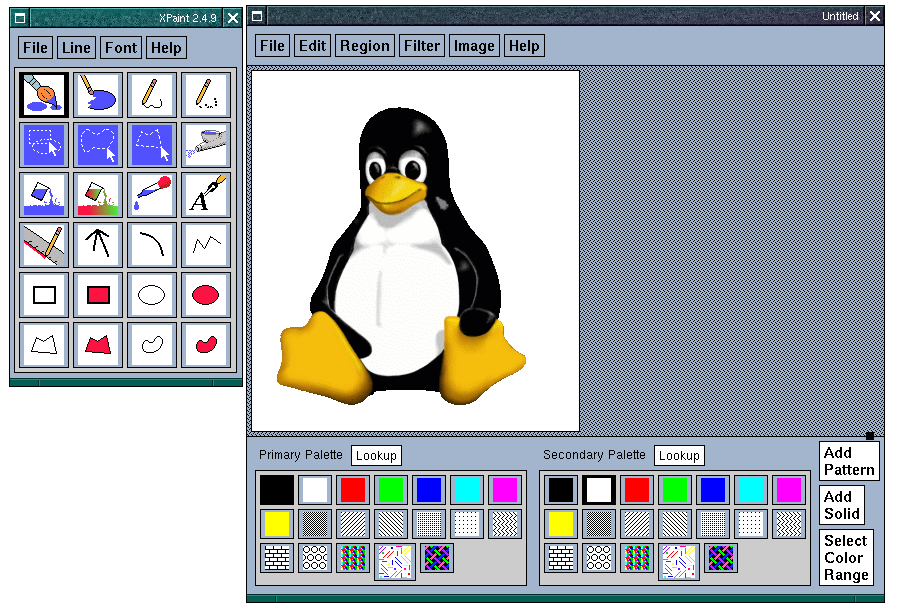
XPaint is a color image editing tool which features most standard paint program options. It allows for the editing of multiple images simultaneously and supports most of the common formats, including PPM, XBM, TIFF, JPEG, etc.
XPaint is divided into a toolbox area, for selecting the current paint operation, and paint windows for modifying/creating images. Each paint window has access to its own color palette and set of patterns, although the paint operation in use is globally selected for all windows. An example of the interface in use is shown in Figure 16.
More information on xpaint can be found at http://home.worldonline.dk/$\sim$torsten/xpaint/.
Unlike xpaint, xfig is a drawing rather than a painting package. The difference is subtle. In a paint
package if you have for instance drawn a line, the application no longer remembers that it is a line, it
is simply a bunch of individual (unrelated) pixels that are now a different colour than they were
previously. In a drawing package the application considers the line as an “object” that can be
moved, modified or deleted without disturbing anything else. xfig allows you to construct
figures using objects such as circles, boxes, lines and spline curves. It is also possible to
import images in formats such as GIF, JPEG or PostScript, imported images are treated
as “objects”. A simple example of what can be easily done with the package is shown in
Figure 17.
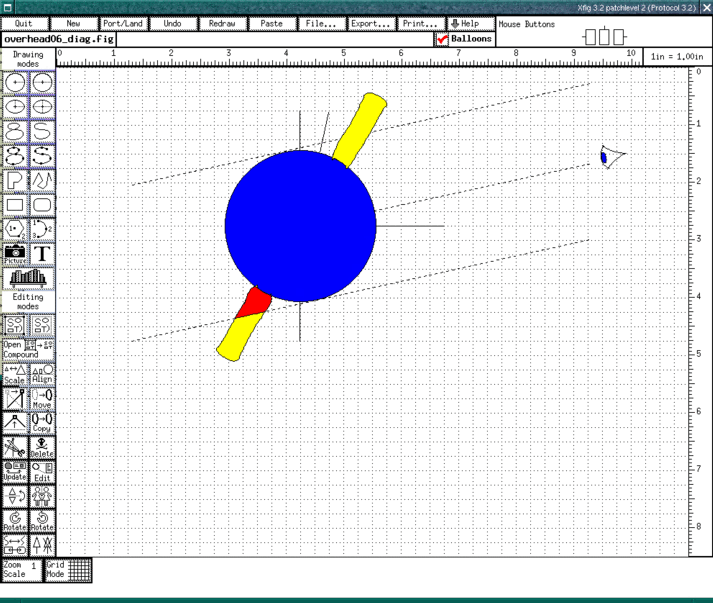
xfig package.xfig saves figures in its native format, Fig format, but they may be converted into various formats
such as PostScript, GIF or JPEG. There are other applications that are capable of producing output in
Fig format that can subsequently be read into xfig. For example, xfig doesn’t have a facility
to create graphs, but tools such as GNUPLOT can create graphs and output them in Fig
format.
More information on xfig can be found at http://epb1.lbl.gov/xfig/.
pstoeditThe pstoedit application can convert PostScript and PDF graphic files into a variety of vector
formats, including the xfig Fig format and the Sketch internal format. pstoedit can be found at
http://www.geocities.com/SiliconValley/Network/1958/pstoedit/.
Sketch is another interactive drawing program which somewhat resembles Corel Draw or Adobe Illustrator. Unusually for such a beast Sketch has been implemented entirely in Python, and to use it you must have Python installed along with the Python Imaging Library. In addition the application also requires Tk/Tcl to be present. More information can be found on the Sketch home page at http://sketch.sourceforge.net/.
Sketch also has a scripting function (using Python) to automate tasks and add new functionality. Since Sketch was been developed in Python, scripts have access to all areas of the application (including internal data structures) which allows user written scripts to be very powerful tools.
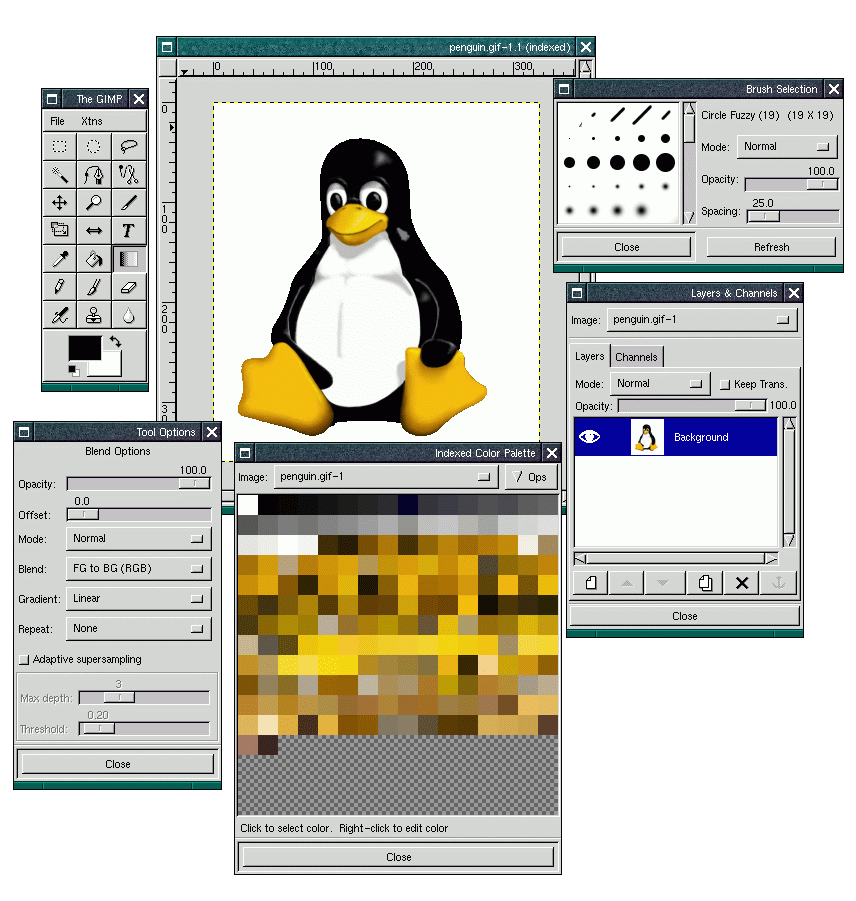
The GNU Image Manipulation Program (GIMP) is package suited to tasks as photo retouching, image composition and image authoring. It can be used as a simple paint program but is perhaps better suited to tasks such as photo retouching. However, the GIMP is extensible. It has been designed to be augmented with plugins, and includes a scripting interface to simplify repetitive image processing, making it suitable for batch processing tasks and image format conversion. Figure 18 shows the interface during a typical GIMP session.
It requires the presence of the GTK+ library. If you are working on a Linux machine it is likely that both GTK+ and the GIMP will already be installed. The latest stable version of the GIMP available before going to press is 1.1.13 (released 29th Nov 1999).
Likened to Adobe Photoshop by its supporters, the GIMP is a complex tool in the right hands, it is a
professional quality graphics package. Unfortunately this doesn’t mean that anything coming
out of the GIMP will be of professional quality, it means that if a professional graphics
artist goes to use it they’ll find all the tools they’re used to or need to get the job done. I
don’t claim to be a professional graphics or layout artist, and am therefore in no position
to try and teach anyone how to use the GIMP. However I still make use of the program
quite extensively when dealing with graphics, because the truth is you don’t have to be a
professional to make use of the GIMP at a basic level. In fact, due to the plugin nature
of Script-Fu some highly advance graphics manipulation techniques are available very
easily to the novice user. A good start is the GIMP User Manual (GUM) which you can
find at http://manual.gimp.org/, however I’d also like point you towards the following
books:
GIMP: The Official Handbook appears to be a bound copy of the GIMP User Manual (GUM), while The Artists Guide to the GIMP is a tutorial style book that seems to be well thought of by the Open Source community.
A good series of introductory articles can be found on The Graphics Muse web site which is maintained by the author of The Artists’ Guide to the GIMP, see http://graphics-muse.com/.
Another good article, also on The Graphics Muse site is “Better aliens through science”. This article shows some of the power of the GIMP when used to do photo manipulation work.
Script-Fu, GIMP-Perl and Gimp::FuThere seems to be some confusion between GIMP Plug-ins and Script-Fu. Plug-ins are external
modules that do the graphics transformations, while Script-Fu is the name of the Scheme based
scripting interface in the GIMP. Scripts written in SIOD, the Scheme subset that GIMP uses, are known
simply as Script-Fu scripts.
GIMP-Perl is the name of the Perl module that interfaces with the GIMP, it is the primary interface
between Perl scripts and the GIMP. However, it does not include easy access to the user
interface (the GUI), nor does it abstract the Procedural Database. These two aspects are more
properly handled by, yet another, Perl module Gimp::Fu. Perl scripts that use GIMP-Perl and
Gimp::Fu are sometimes referred to as Perl-Fu scripts. All this can get somewhat confusing at
times. The GIMP-Perl extensions have been part of the core GIMP distribution since version
1.1, however if you are using GIMP on even a recent distribution of Linux (e.g. RedHat
6.x) then it is likely that you are using and older version of the GIMP (1.0.x or below).
The simplest course if you want to make use of GIMP-Perl interface is to ask your system
manager to upgrade your version of the application, alternative you can download the
plug-in from the GIMP Plug-In Registry. The official GIMP-Perl web site can be found at
http://www.goof.com/pcg/marc/gimp.html.
A good introduction to the GIMP-Perl extensions can be found (again) at the The Graphics Muse site:
Gimp-Perl Introduction (July 1999)Gimp-Perl Part II (August 1999)An example script, taken from the GIMP-Perl documentation, to add a “scratch effect” to an image is shown below:
GIMP-Python is a package that allows people to write plug-ins for the GIMP in Python rather than
Script-Fu (Scheme), Perl or C. GIMP-Python binds to the GTK+ Python extention library PyGTK,
found at http://www.daa.com.au/~james/pygimp/, rather than the more commonly used (under
Python) Tkinter extentions for a more consistent look and feel interface to the GIMP. The package
provides an almost complete wrapper for the libgimp plug-in library, and also offers Script-Fu
capabilities through the gimpfu module.
An example of a GIMP-Python plug-in (a translation of the Script-Fu clothify plug-in) is shown
below, in this example the GUI is generated by the gimpfu module.
The GIMP-Python manual is available as either HTML or DocBook SGML at:
The package can be downloaded via FTP from ftp://ftp.daa.com.au/pub/james/pygimp/. It should be noted that the version available at the GIMP Plug-In Registry is out of date.
The GIMP Plug-In Registry is a central repository for GIMP extentions, and can be found at http://registry.gimp.org/. The available plugins provide everything from support for exotic file format (e.g. Adobe Photoshop) to interfacing with SANE. If you have a graphics problem that someone else might have faced, and you are considering using the GIMP, maybe you should look here before trying to write your own code to do the job.
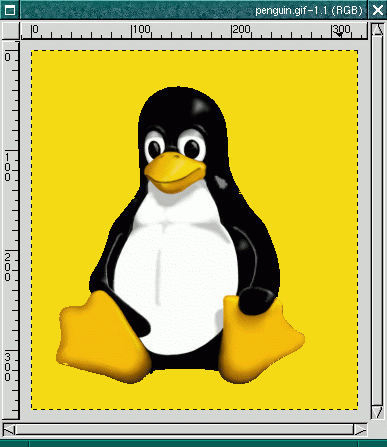
One important feature of the GIMP that most casual users, who aren’t used to applications such as Photoshop, may not be aware of is the concept of layers. Let us work through an (very) basic example together to show you how they can be useful.
Take an image – I’m going to use Larry Ewing’s image of Tux the penguin, the Linux mascot (see Figure 19). As part of the example we are going to want to modify the channel levels of the image, since my example image was a GIF (pseudo colour) image we need to convert it to RGB before we start to play with it. Alot of the GIMP tools work only on RGB (true colour) images rather than indexed (which is how the GIMP refers to pseudo colour).
This is not a problem, if your image is not RGB to begin with right click on the image to bring up the actions menu and choose Image→RGB
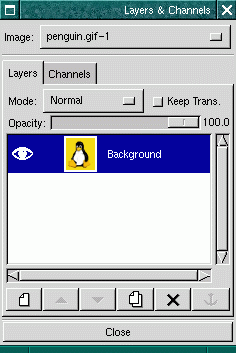
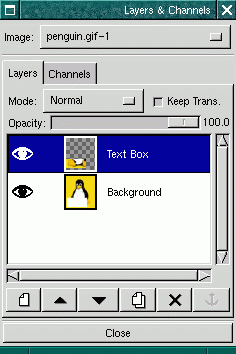
We now want the Layers & Channels dialog, so bring up the action menu again and choose Layers→Layers & Channels, this should produce a dialog similar to Figure 20.
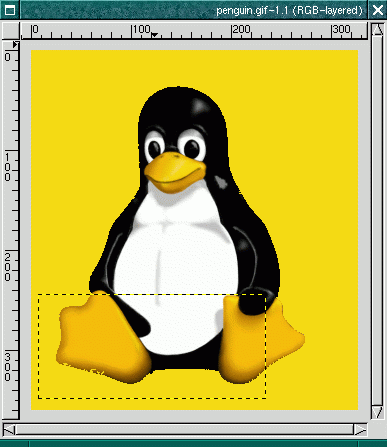
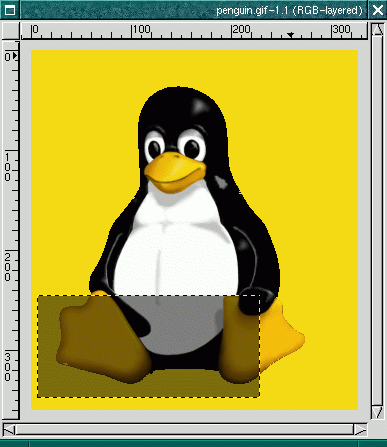
As I’ve done in Figure 21 we want to select a box on the image, we’re going to put some text in the box so it needs to be big enough to write in.
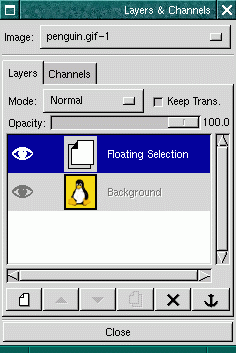
We want to select this area to work with, go to the menu and choose Select→Float. If you look at the Layers & Channels dialog (Figure 22) you should see that a “Floating Selection” has appeared.
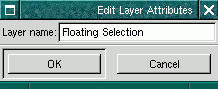
Double click on the Floating Selection layer in the Layers & Channels dialog, a pop-up dialog will appear allowing you to rename it (as in Figure 23). We’re going to make this a text layer, so call it something appropriate like “text Box”.
Make sure the new layer is selection in the Layers & Channels dialog (see Figure 24).
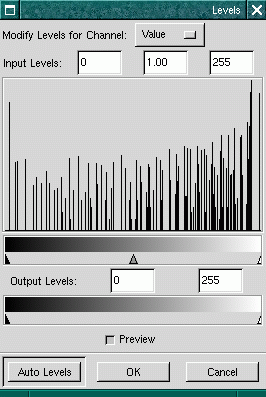
Back to the image and bring up the menu, select Image→Colors→Levels to bring up the Levels dialog (see Figure 25).
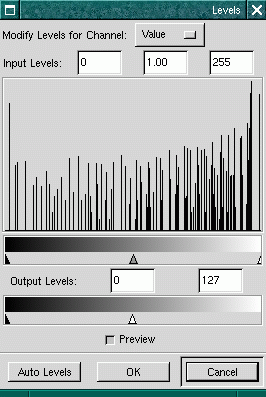
We want to change the cut off level in the layer, so move the upper (white) slider in the lower (Output Level) bar from the extreme right to around the centre of the allowed range. So long as the preview button above this slider is selected you should see out text box getting darker. If you are not sure what I’m talking about here compare Figure 25 (before) and Figure 26 (after).
Hit OK and the you should end up with something like Figure 27.
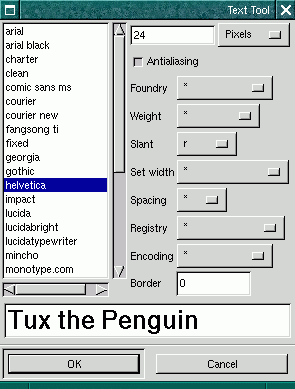
Now we want some text, bring up the menu and select Tools→Text. Alternatively, you can also go to the control panel (probably by now exiled to the corner of your screen) and hit the Text Tool button (the T button mid-way down the right hand side). Either of these actions will bring up the Text dialog (see Figure 28). Choose your font and whatever font properties you wish, and type some text into the dialog. On hitting OK you’ll find that the text appears as a floating selection which you can move around using the Move Tool (the thing that looks like a addition sign, third down on the left hand side of the control panel, or Tools→Move from the action menu).
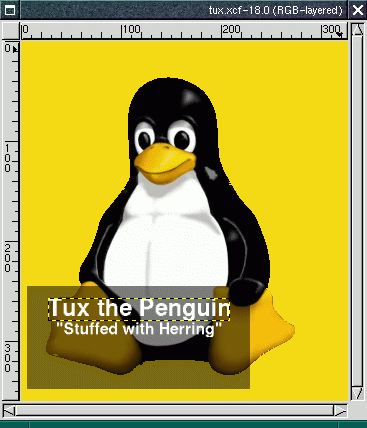
If you look at your Layers & Channels dialog again you’ll see that the the text has appeared as another “Floating Selection”. We’ve just created another layer in our image. Rename this layer as before and use the text tool to add any additional text you want to the image, see Figure 29
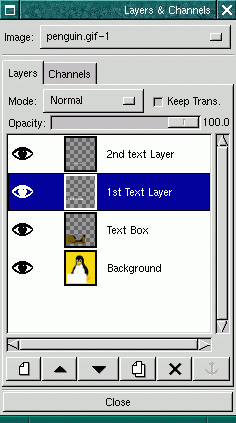
Figure 30 shows the Layers & Channels dialog after adding two additional layers with the Text Tool, the first text layer is selected (which is why the words “Tux the Penguin” are surrounded with a dotted line in Figure 29.
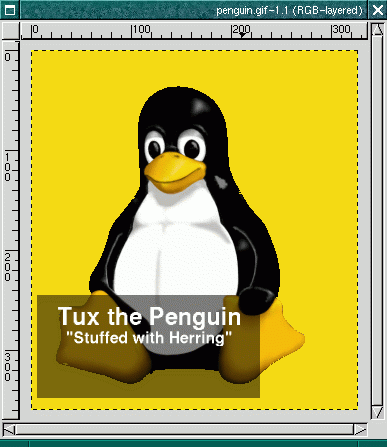
Click on the “Background” layer in the Layers & Channels dialog, and you should be left with something like the pen-ultimate figure in the series, Figure 31.
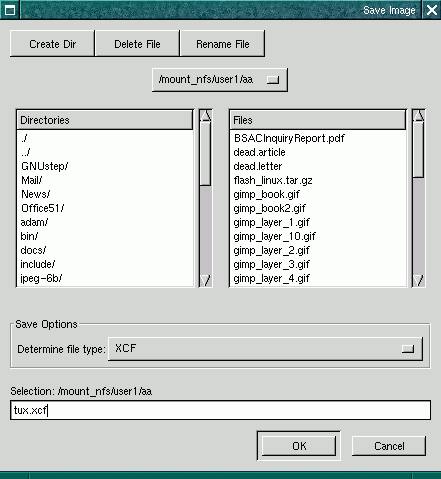
Now select File→Save As from the action menu, see Figure 32, to bring up the File dialog.
Save the image as an XCF file. Then go back to the image and select Layers→Merge Visible Layers from the menu, choosing Expand as necessary from the popup menu. If you look at the Layers & Channels dialog you’ll see that your carefully crafted layers have disappeared and we now have a flat bitmap. You can now save the image in a usable format, although since we currently have an RGB image if you want to save it as GIF (for instance) you’ll have to change the image back to Indexed by selecting Image→Indexed from the menu.
Okay, you are probably now wondering why we went to all this trouble of creating multiple layers for such little pay back. Well we can now go back to our saved XCF image at any time in the future and change things, GIMP can work with individual layers so, for instance, we can delete or move the text easily by deleting or moving its layer. Layers add flexibility, it would be very difficult to remove the text from our final GIF image, but with the layered XCF image this is a trivial operation.
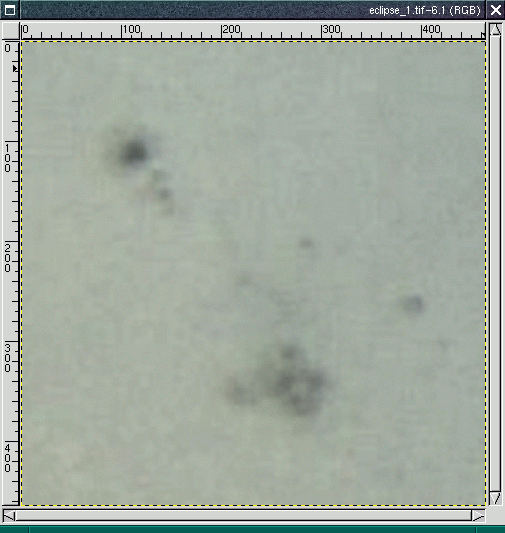
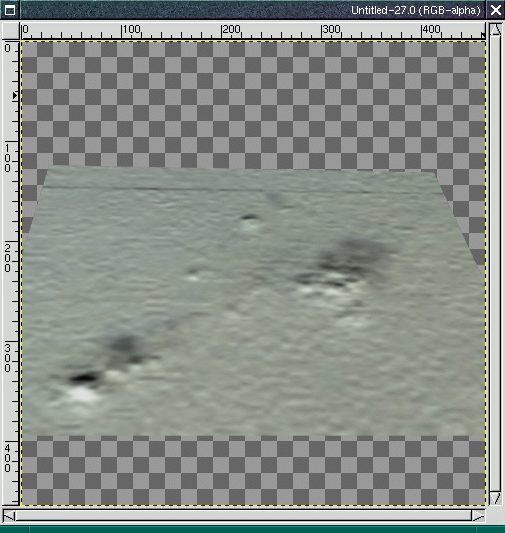
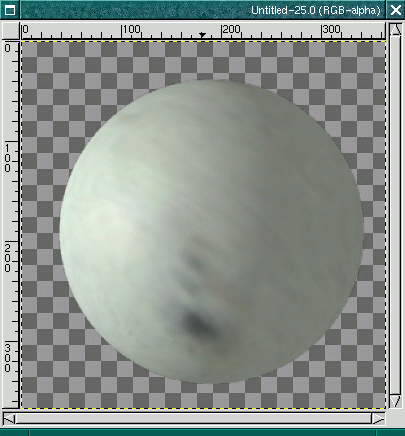
You may have noticed the rather nice star spot image on the front cover of the cookbook. The inital star spot image, see Figure 33, was generated using some modelling code which wrote out a greyscale image using PGPLOT. Mapping the image onto the sphere was done using the GIMP.
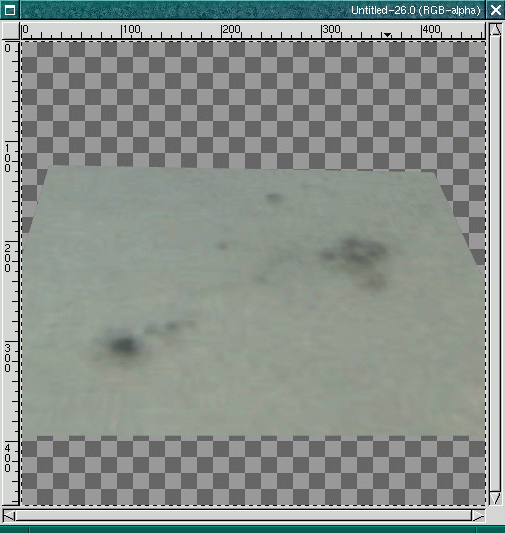
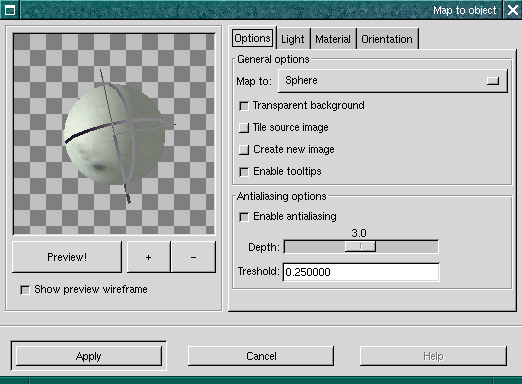
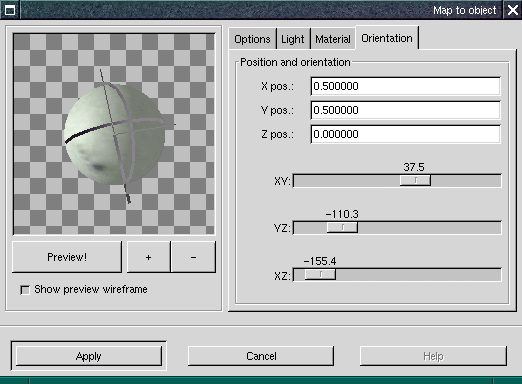
Mapping images onto solid objects is just one of the many tools and filters avialable in the GIMP, the map object function can be found by selecting Filters→Map→to Object. Newer version of the GIMP (≥1.1x) have the ability to map images more complex objects, however the version I was using (v1.0.4, shipped with RedHat 6.0) only allows you to map objects to a sphere (see Figure 34) or a plane (see Figure 35).
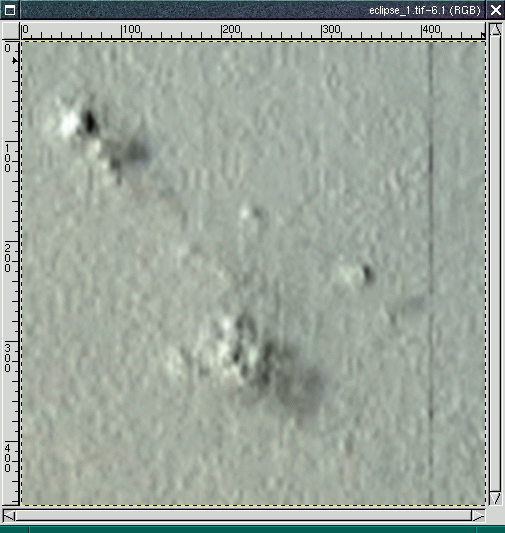
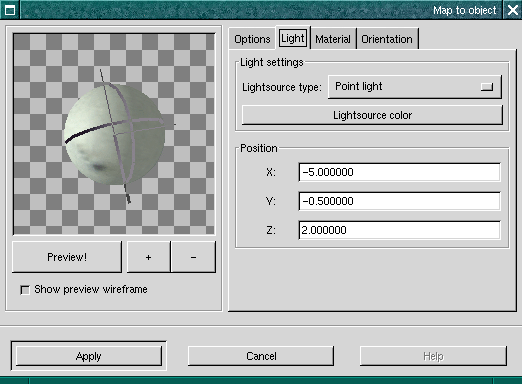
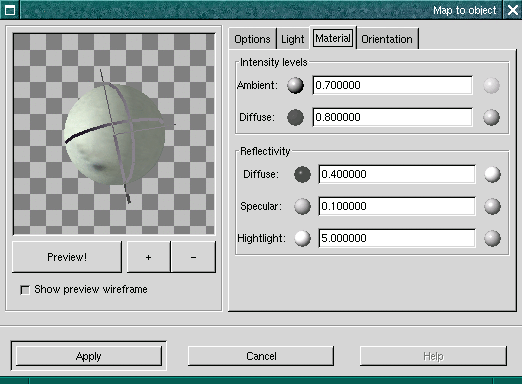
Another interesting thing that you can do with the mapping functions in the GIMP is bump map our image (see Figure 36) by selecting Filters→Map→Bump Map to emphasize the star spots. In this case I’ve used a bump map followed by a gaussian blur, Filters→Blur→Gaussian Blur (IIR), to soften the effect. The bump mapped image can be seen in mapped onto a plane in Figure 37. The Map Object dialog can be seen in Figures 38, 39, 40 and 41.
Another way to present our star spot map is given by the Script-Fu→Animate→Spinning Globe extention. This generates multiple maps onto a sphere and could be used to create an animated GIF of our star.
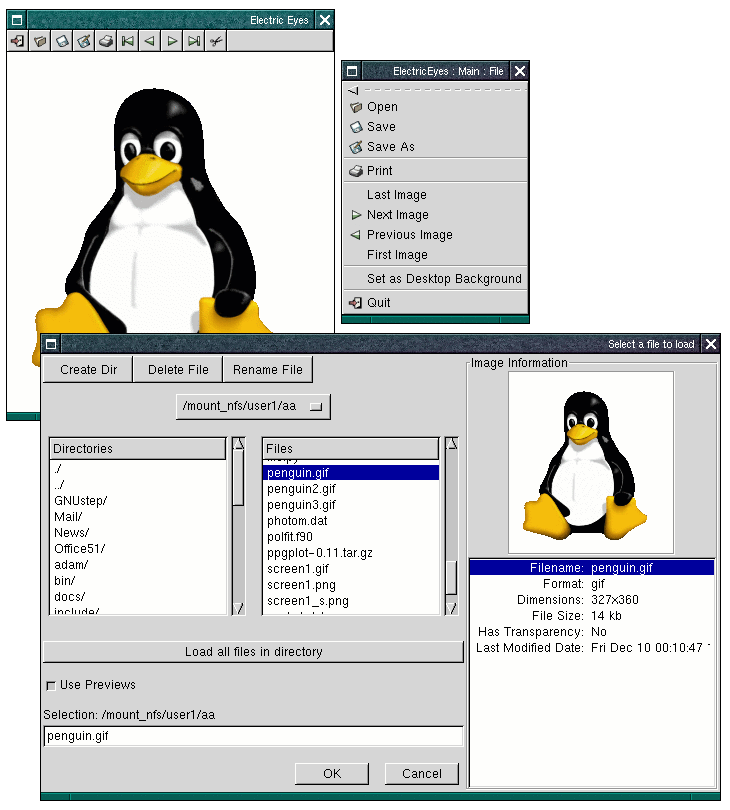
The development of Electric Eyes is bound up along with GNOME, the GNU Project user environment. It was originally intended to be the default image viewer on the GNOME/Enlightenment desktop, although it does now have some limited image editing facilities. An example of the Electric Eyes interface, which is typically GNOMEish, is shown in Figure 42
If you have GNOME, for more information see http://www.gnome.org/, installed then Electric Eye will likely also be installed. If you are working on a RedHat Linux box this is almost certainly the case.
WhirlGIF is a command-line utility for generating multi-image GIF animations from a sequence of GIF files. More information can be found at http://www.msg.net/utility/whirlgif/. For example:
would create an animated GIF (directed to standard out) from all files in the current directory fitting
the pattern file*.gif, which would loop five times before stoping and have colour #00f10e set to be
the transparent index. While:
would create an animated GIF (called out.gif) from the files a.gif, b.gif, c.gif, d.gif and e.gif. The d.gif
file would be displayed for 1s, while the remaining frames would be displayed for only 50ms each (delays are
in units of 1/100
th of a second).